

Drive a stick in high heels? "Pretty Woman" a brownie at a selectmen? Whether that flaming item is underwear or a hot pocket I'm your girl. I call them moments of whimsy and this is the place where I take you along for the ride.
Saturday, June 4, 2016

Tuesday, April 26, 2016
8 Reasons Why Toddlers are Awesome

When you're in the thick of parenting a toddler the meltdowns and general bad behavior make it easy to bemoan this stage. They don't listen. They won't eat. They sass back, they hit, they bite, they pee their pants, and get into everything. Then there are those moments, usually when she is curled in my lap asleep, that I remember how fast the last two years have been. As tough as those 2 a.m. feedings were, I miss that time. Just the two of us wrapped in dark, snuggled together breathing each other in. I know deep down there will come a time (possibly far, far in the future) when I will miss these toddler days and wish I had stopped to appreciate them more, so with no further ado I give you 5 reasons toddlers ROCK!
1. They return the favor and cheer when you go pee pee on the potty like a big girl.
2. "Look! A plane!" Everyday sights are new and wonderous.
3. They embrace nudity and love their bodies in a way I wish I could.
4. A toddler is free to follow their bliss with zero cares about what other people think or want.
5. The moments when you find your kid talking to thin air and are reminded of the epic technicolored world inside your own childhood imagination.
6. Toddlers are gangsters. They are not afraid to call your bluff and dare even the sternest mommy to do something about it. Sometimes I wish I had those cajones.
7. Toddler speak. There is nothing that brightens my day faster than my daughter's mixed up consonant sounds.
8. The moment when you walk in the door and they screech your name and come running.
Friday, April 22, 2016
Summer Bucket List

The past few days have been so nice it's been hard to reel in the summer and remind myself that it's only April. That being said out came the flip flops and I started making plans in my head for things I wanted to do when the warm weather is here for good. Then, I realized that everything on the list was for the kids. That's when I decided I needed a mommy summer bucket list. A list of at least 10 things I wanted to do for myself this summer, so here goes:
1. Go to the beach by myself for a day. Sit with my feet in the water, read my book, listen to my music, and not have to talk to anyone for at least 4 hours.
2. See a sunrise over the lake.
3. Get dressed up and go out for drinks and dancing. Maybe even show some cleavage.

4. Go on a date to the drive-in and make out during intermission.
5. Have a sisters slumber party
6. Go Kayaking on the Saco and camp out
7. Make ice cream
8. Have a bonfire in the back yard
9. Sleep until noon
10. Explore some cute little town
11. Complete a 60-day photo challenge
12. Learn to cross stitch
13. Take a vacation in Wolfeboro
14. Decorate my bedroom
15. Lose 10 pounds
What is on your summer bucket list? Does anyone have suggestions for things I should add to mine? I promise I'll keep you all updated as I check items off. Here's to one amazing summer.
Monday, April 11, 2016
Mommy Blogger
When I started this blog my bio read something like, "Laura is a single, twenty-something, who is decidedly childless, much to her mother's chagrin." Yet, here I am; a married, nearly mid-thirty, mommy of two, who hasn't written a word since the birth of my first bundle of joy two and a half years ago. I mentioned to my friend earlier today that I wanted to get back to blogging and she immediately said with a grin, "Oh you're going to be a mommy blogger!" For some reason I recoiled at the idea. At the heart of it, yes, I am now a mommy blogger, because well, I'm a mom and I'm a blogger. Also, because I'll probably end up writing about what it is that most moms who are bloggers write about: poop mishaps, dopey spouses, projects I haven't yet lost interest in, mishaps involving poop, random rants about bad parkers, and yes probably more mishaps involving human waste. But, in so many ways this blog isn't about being a mommy any more today than it was when I started it 8 years ago. The difference is that I know now that being a mommy doesn't and can't define me anymore than being single and childless did back in 2008. My voice is unchanged.
I used to have dreams. Things I wanted to do and places I wanted to go. My hiatus from this blog and the dwindling of posts before then seem to signify a time when I turned my eye from the world and stopped thinking about somedays. The here and now needed too much attention. Today I feel like I'm stepping outside on that first truly warm day in late winter. I'm back here and writing again because I need to remember that just because I'm a mom with the proverbial overflowing plate and a thousand responsibilities doesn't mean that I shouldn't be thinking and hoping about what is to come next. Balance is key. I can live in the present. I can be grateful for my blessings and not wish the minutes past. I can also dream of the future, setting goals and moving towards the me that will be writing a decade from now. The wiser me who will be shaking her head at where I am today and all the distance still to go.
I used to have dreams. Things I wanted to do and places I wanted to go. My hiatus from this blog and the dwindling of posts before then seem to signify a time when I turned my eye from the world and stopped thinking about somedays. The here and now needed too much attention. Today I feel like I'm stepping outside on that first truly warm day in late winter. I'm back here and writing again because I need to remember that just because I'm a mom with the proverbial overflowing plate and a thousand responsibilities doesn't mean that I shouldn't be thinking and hoping about what is to come next. Balance is key. I can live in the present. I can be grateful for my blessings and not wish the minutes past. I can also dream of the future, setting goals and moving towards the me that will be writing a decade from now. The wiser me who will be shaking her head at where I am today and all the distance still to go.
Friday, March 22, 2013
Shelving Do-It-Yourself
Note: I am by no means a DIY expert and don't pretend to be. Rather I am a woman with an unhealthy preoccupation with power tools. Please read all installation directions and safety procedures and happy drilling.
The awkward space between the kitchen cabinets and the sliding glass doors has plagued me since we moved into this house nearly three years ago. Year one it just contained the black clock. In year two I added the mail sorter in a bid to get the envelope situation in this house under control. The sorter is pretty, but it looks terrible there and I'm pretty sure that those are the same bills I shoved into its pockets a year ago. It looks messy and there is still mail everywhere!
 This is my solution. Personally, I think it looks about a thousand times better. The space seems better integrated with the rest of the kitchen and it gives a nice focal point as you walk in the door (this wall is directly across from the front door in open concept living space of my house).
I began the project by first collecting my materials: 4- 7' x 7" decorative brackets from Home Depot, 2- 10" wide by 2' long pieces of board ( I selected a 10"x 6' board and had the Home Depot folks cut it for me), 1 can of spray paint, 1 packages of dry wall anchors
Then, by collecting my tools: stud finder, level, tape measure, sander (or sand paper), phillips screw driver, drill, 3/4 drill bit
I began by applying a coat of spray paint to the brackets. Spray paint is really convenient, there are no brushes and little clean up, but you have to be careful to keep the paint far enough away and to move back and forth in smooth strokes in order to avoid drips and uneven color. While I was waiting for the paint to dry I used my palm sander to sand the rough edges on the boards.


While I waited for the paint to dry a second time I used my tape measure and level to lay out the placement of my brackets. Earlier I had used my stud finder to mark the studs in the wall and had run into my first minor road block. The studs between the cabinets and the sliding glass door were irregularly spaced. Due to this I had decided to use dry wall anchors to attached the shelves rather than screw the brackets directly into the stud, which was my first inclination.


I slid the bracket key hole over the screw head and pulled down to secure the bracket on the screw.

Once all four brackets were secured to the wall I placed my painted boards on and was amazed by how different the area already looked.


The awkward space between the kitchen cabinets and the sliding glass doors has plagued me since we moved into this house nearly three years ago. Year one it just contained the black clock. In year two I added the mail sorter in a bid to get the envelope situation in this house under control. The sorter is pretty, but it looks terrible there and I'm pretty sure that those are the same bills I shoved into its pockets a year ago. It looks messy and there is still mail everywhere!

I began the project by first collecting my materials: 4- 7' x 7" decorative brackets from Home Depot, 2- 10" wide by 2' long pieces of board ( I selected a 10"x 6' board and had the Home Depot folks cut it for me), 1 can of spray paint, 1 packages of dry wall anchors
Then, by collecting my tools: stud finder, level, tape measure, sander (or sand paper), phillips screw driver, drill, 3/4 drill bit
I began by applying a coat of spray paint to the brackets. Spray paint is really convenient, there are no brushes and little clean up, but you have to be careful to keep the paint far enough away and to move back and forth in smooth strokes in order to avoid drips and uneven color. While I was waiting for the paint to dry I used my palm sander to sand the rough edges on the boards.

Once I was finished with that the first coat of the paint was dry. I put a first coat of paint on the boards and a second coat on the brackets, turning them to assure coverage from every angle.

 |
| The Stud Finder blinks and give a beep when it senses the edge of a stud. |
 |
| Drywall Anchors come in package like this and are rated for different weights. I planned to place mostly small decorative objects on mine so I selected anchors rated for 50 pounds. |
 |
| I marked where I wanted the shelf to lie, where I wanted the brackets to sit and where I needed to drill the holes on the wall before taking out my drill |
Once I had decided on the position of the brackets I used a scientific and time tested method for placing the holes... I held the bracket up to the wall on its side so that I could see where the key hole was and marked it. O.k. so maybe my husband would have a cow if he saw me doing it this way, but I'm a visual person. For all you mathmeticians out there, I doubled checked the hole placement by measuring the bracket from its top to the top of the key hole and divided the width of the bracket in half. When I checked the measure it method against my visual method the results were the same.

Now that I have the holes marked I placed the 3/4 drill bit in the drill. The bit has to be larger than what I would use for a normal screw because the dry wall anchor gets pressed into the hole with the anchors employing barbs on either side that allow the screw to hold extra weight. The screws are then screwed into the anchor.


I slid the bracket key hole over the screw head and pulled down to secure the bracket on the screw.

Once all four brackets were secured to the wall I placed my painted boards on and was amazed by how different the area already looked.


I filled the shelves with a collection of bits and bobs from around the house, using cranberry as an accent color to reflect the color the the dining room. I think the the transformation is remarkable. What do you think?
Thursday, March 7, 2013
Cinnamon Bun Cupcakes
A little while ago I tried a recipe that celebrates a marriage of two crowd favorites: cinnamon buns, and cupcakes. This one manages to be sweet without going overboard and the cinnamon adds just a bit of dimension to the cake. Here's what I did:

In a small bowl I created a mixture of brown sugar, cinnamon, nutmeg, and ginger (you could use allspice aswell, but I didn't have any).

In a second small bowl I sifted together flour, baking powder, and salt. In a large bowl I used my mixer to beat unsalted butter until fluffy. I alternately added sugar and eggs then splashed in some good quality vanilla before mixing until the mixture was light and fluffy.
Then I alternately added the flour mixture and milk to the butter mixture (sorry for no pictures of this step. The mess was really flying).
Once the batter was ready, I filled the prepared cupcake liners about halfway then sprinkled the batter with a spoonful of the cinnamon mixture. I topped up the cups so they were 3/4 of the way full then inserted a butter knife into the batter and swirled it in an "S" shape to create a cinnamon sugar swirl in the cake.

Sprinkle the remaining cinnamon mixture over the cupcakes and bake them for about 20 minutes.

While the cupcakes baked I prepared a batch of Creamy Butter Frosting. First I placed softened butter in a large bowl and beat it for 30 seconds. I then beat in vanilla and salt. When it comes to adding powdered sugar to frosting I have a rule, I start with half the amount in the recipe. Then I increase it a 1/2 cup at a time alternating with tablespoons of heavy cream until I have reached the right consistency. That's what I did here.


In a small bowl I created a mixture of brown sugar, cinnamon, nutmeg, and ginger (you could use allspice aswell, but I didn't have any).

In a second small bowl I sifted together flour, baking powder, and salt. In a large bowl I used my mixer to beat unsalted butter until fluffy. I alternately added sugar and eggs then splashed in some good quality vanilla before mixing until the mixture was light and fluffy.
Then I alternately added the flour mixture and milk to the butter mixture (sorry for no pictures of this step. The mess was really flying).
Once the batter was ready, I filled the prepared cupcake liners about halfway then sprinkled the batter with a spoonful of the cinnamon mixture. I topped up the cups so they were 3/4 of the way full then inserted a butter knife into the batter and swirled it in an "S" shape to create a cinnamon sugar swirl in the cake.

Sprinkle the remaining cinnamon mixture over the cupcakes and bake them for about 20 minutes.
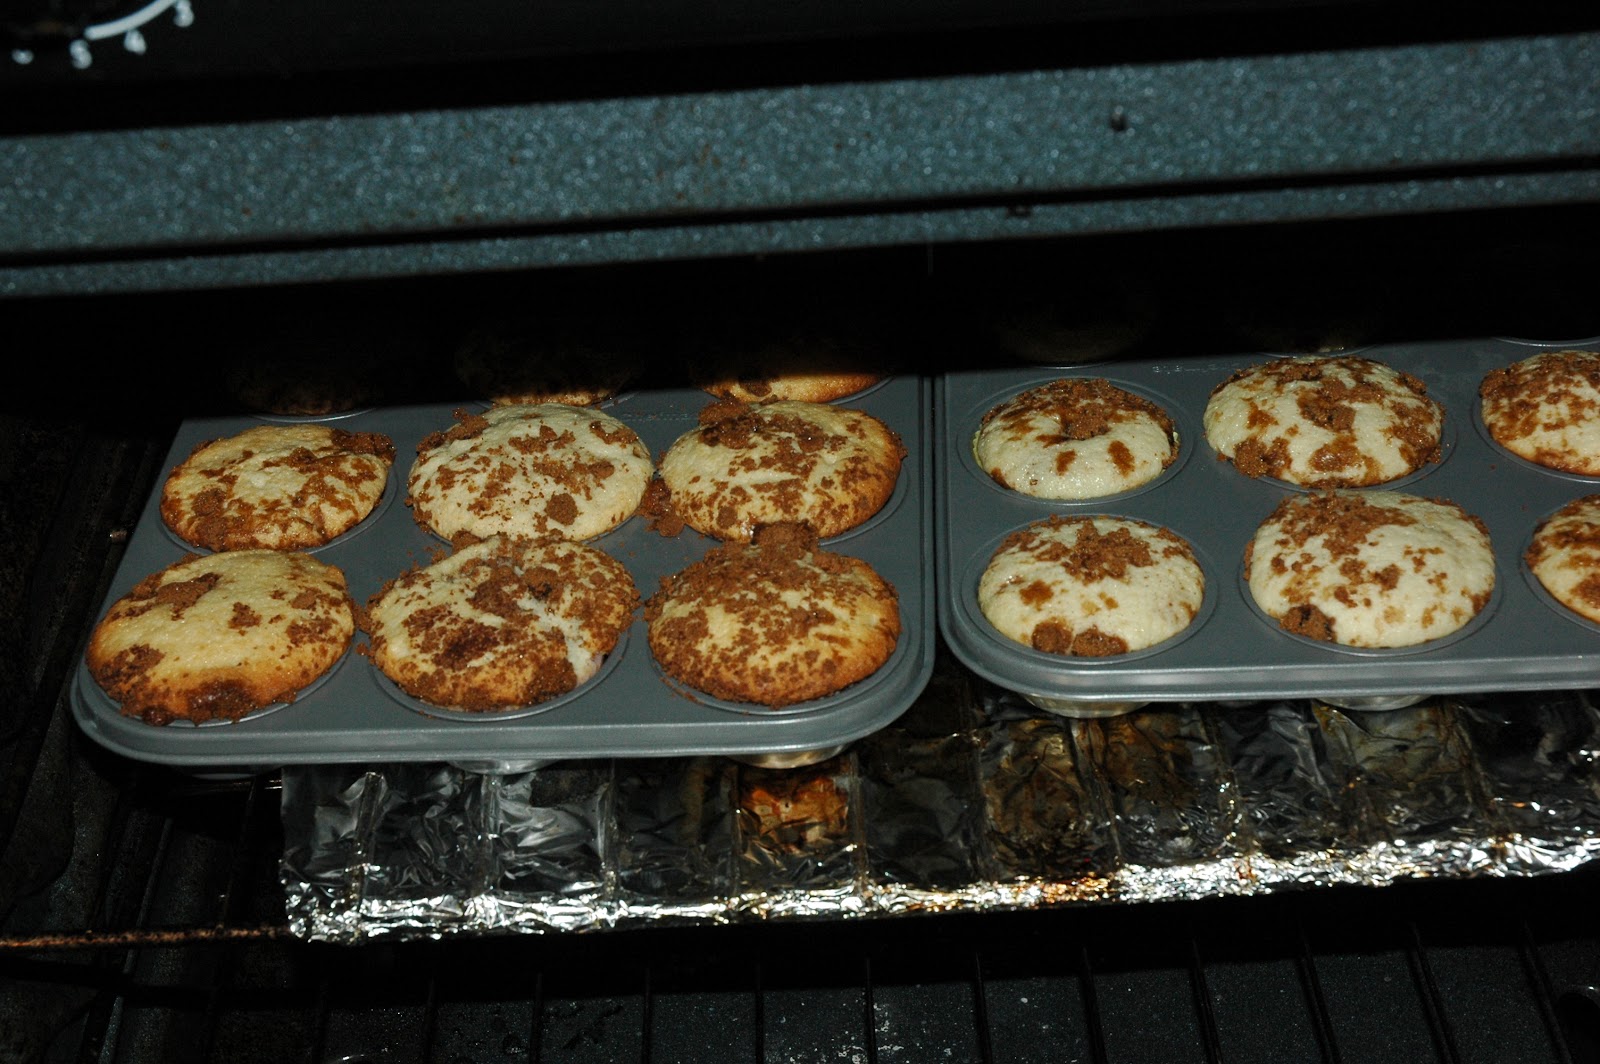
While the cupcakes baked I prepared a batch of Creamy Butter Frosting. First I placed softened butter in a large bowl and beat it for 30 seconds. I then beat in vanilla and salt. When it comes to adding powdered sugar to frosting I have a rule, I start with half the amount in the recipe. Then I increase it a 1/2 cup at a time alternating with tablespoons of heavy cream until I have reached the right consistency. That's what I did here.

I wanted to play with my piping techniques which resulted in the unfortunate frosting application below. Next time I think I would go for a more rustic application that better mirrors a real cinnamon bun.
Cinnamon Roll Cupcakes
350 Degrees
Makes 24 Cupcakes
2 1/2 cups flour
2 1/2 tsp baking powder
1/2 tsp salt
3/4 cup brown sugar
2 tsp cinnamon
1 1/2 tsp nutmeg
1 1/2 tsp ginger
1 tsp allspice
2/3 cup butter
2 eggs
1 3/4 cups sugar
1 1/2 tsp vanilla
1 1/4 cups milk
1. Mix flour, baking powder, and salt in a small bowl. In a separate bowl combine brown sugar and spices. Set both aside.
2. In a large bowl beat butter until fluffy. Add granulated sugar 1/4 cup at a time. Beat for about 2 minutes or until light and fluffy.
3. Add eggs one at a time. Beat after each then beat in vanilla.
4. Alternate adding flour mixture and milk, beating on low after each addition.
5. Spoon half batter into prepared baking cups, then sprinkle with cinnamon mixture.
6. Fill cups the rest of the way with batter then sprinkle remaining cinnamon mixture on top.
7. Bake 18 to 20 minutes.
Creamy Butter Frosting
1. Allow 1 cup unsalted butter to stand at room temperature for 30 minutes.
2. In a large bowl beat butter for 30 seconds.
3. Beat in 1 tsp vanilla and pinch of salt.
4. Gradually add 4 cups of powdered sugar. Beat until combined.
5. Beat in 1/4 cup whipping cream.
6. Beat in 4 cups additional powdered sugar.
7. Beat in 2 to 3 tablespoons of whipping cream until frosting reaches correct consistency.
Makes 4 cups

Wednesday, March 6, 2013
5 Random Things- March
Today I am linking up with Growing Up a Thomas for 5 Random Facts March!!
1. Every year in January I think, "OH MY GOODNESS! I HAVE TO HAVE GIRL SCOUT COOKIES!" and then in March I think "Oh my goodness if I eat all these cookies I will; A. Be sick B. Be as big as a house and C. be so sad they are all gone until next year." This year I have devised a brilliant plan to solve this serious issue. I carefully counted the total number of cookies I have, 124 cookies. Then I divided them by 12 months, which comes out to 10 cookies a month with 4 cookies left over. I will then label 12 freezer baggies January through December and freeze my 12 month allotment of girl scout cookie yumminess. In this manner I may; enjoy the cookies throughout the year, avoid eating all five boxes in one sitting and make myself sick and avoiding being so Girl Scout cookie deprived that I do this to myself once again next year. That is the plan folks. We shall see how it works out for me.

2. Has this ever happened to you? You walk in after a long day at work and smell a funk then spend the next 20 minutes playing "Find That Stink"? For those of you who are more fastidious than I, this is a fun little game where one spends a crazy amount of time playing nose based hot and cold as you search for the source of a stinky smell. In my case it was a forgotten carrot lost at the bottom of the crisper.
3. I learned today that a woman I know is retiring at the end of the year due to being connected to a prostitution scandal. It always weirds me out when what I am watching live at 6 is ripped from my life. It seems to be happening with alarming frequency in the past couple of years. I wish some of these sensations were positive.
4. I'm making this amazing asian pasta dish to go with dinner tonight and hoping to snap some shots so I can share the recipe with y'all sometime in the near future so stay tuned:). Oh man I am hungry. Can you tell?

5. I am so excited for spring. Are you excited for spring? I am planning the garden and lusting after my cute sun dresses. Meanwhile, I am huddled in front of my space heater wearing fleece and fur.
1. Every year in January I think, "OH MY GOODNESS! I HAVE TO HAVE GIRL SCOUT COOKIES!" and then in March I think "Oh my goodness if I eat all these cookies I will; A. Be sick B. Be as big as a house and C. be so sad they are all gone until next year." This year I have devised a brilliant plan to solve this serious issue. I carefully counted the total number of cookies I have, 124 cookies. Then I divided them by 12 months, which comes out to 10 cookies a month with 4 cookies left over. I will then label 12 freezer baggies January through December and freeze my 12 month allotment of girl scout cookie yumminess. In this manner I may; enjoy the cookies throughout the year, avoid eating all five boxes in one sitting and make myself sick and avoiding being so Girl Scout cookie deprived that I do this to myself once again next year. That is the plan folks. We shall see how it works out for me.

2. Has this ever happened to you? You walk in after a long day at work and smell a funk then spend the next 20 minutes playing "Find That Stink"? For those of you who are more fastidious than I, this is a fun little game where one spends a crazy amount of time playing nose based hot and cold as you search for the source of a stinky smell. In my case it was a forgotten carrot lost at the bottom of the crisper.
3. I learned today that a woman I know is retiring at the end of the year due to being connected to a prostitution scandal. It always weirds me out when what I am watching live at 6 is ripped from my life. It seems to be happening with alarming frequency in the past couple of years. I wish some of these sensations were positive.
4. I'm making this amazing asian pasta dish to go with dinner tonight and hoping to snap some shots so I can share the recipe with y'all sometime in the near future so stay tuned:). Oh man I am hungry. Can you tell?

5. I am so excited for spring. Are you excited for spring? I am planning the garden and lusting after my cute sun dresses. Meanwhile, I am huddled in front of my space heater wearing fleece and fur.
Sunday, March 3, 2013
Winter Getaway
In January Mr. Onion and I were having a conversation we have pretty frequently around here, it goes something like this;
Mr. Onion: I'm tired
Me: Yeah you should be you've been up since 4, done the chores, spent 8 hours cutting wood, then did the chores again, spent time with your mother, etc, etc.
Mr. Onion: Huh...
Me: You need a vacation! This is just crazy! (thinking) You know you took 3 days off in all of 2012?
Mr.Onion: No, it had to have been more than that.
Me: No. (Ticking them on my fingers) Our anniversary, Ryann's wedding, Fryeburg Fair.
Mr. Onion: Oh, I guess you're right.
End Scene
A short while later I decided to put my foot down/ trick the Onionator into taking a little break/ sneak in a little break of my own, by giving him a two night getaway for his birthday. Since Mr. Onion's birthday fell during my February break we scheduled our trip for then and spent 2 chilly, snowy nights and 3 chilly, glistening days in beautiful Bradford, NH. Bradford is a teeny tiny town in the Mt. Sunapee region of NH surrounded by other tiny town each with their own small cluster of restaurants and shops surrounded by rolling mountains and scenic farms. We stayed in the honeymoon suite of a place called the Rosewood Country Inn.
It was glorious!


We slept in. We ate breakfast. We took a nap or read. We drove around and explored until we found a good place for lunch. Then, we drove back to the inn and took another nap, got dressed and went to dinner, only to return to the inn for more lounging.


Mr. Onion remarked that some may think it sad that our idea of a fabulous vacation is lots of sleep, and food, and driving to see where this road leads. While it certainly isn't the full itinerary of the expeditions of my youth, in my opinion, sometimes a good dose of rest and relaxation is worth every penny.


Wednesday, February 13, 2013
God Made a Farmer
I had this idea to honor my love for valentine's day here on my blog. I wanted to tell you all the mushy, wonderful ways in which Mr. Onion makes me glad to be his wife every day. I reflected on those qualities that make him a man I am honored to call mine and then I thought of a classic piece of oration which lately gained some serious press. When I hear this piece it brings tears to my eyes and an overwhelming pinch to my heart. It says it all so beautifully. This is my little salute to my hardworking, soft, yet strong, thoughtful and smart and smart mouthed, wonderful husband and to all those men out there who embody all that is good in this world.
God Made a Farmer by Paul Harvey 1978
And on the eighth day, God looked down on his planned paradise and said, “I need a caretaker.” So God made a farmer.God said, “I need somebody willing to get up before dawn, milk cows, work all day in the field, milk cows again, eat supper, then go to town and stay past midnight at a meeting of the school board.” So God made a farmer.


Happy Valentine's Day
Tuesday, June 19, 2012
How to Remove a Spouse from Your Half
I tried to get into bed last night only to find Mr. Onion doing the running man right smack in the middle. That's right! There was one hairy, muscled thigh with attached foot and funky toe nails, a log like right arm, and one adorable snoring face, all on my side of the bed. This is a test of even the most experience wives trickery. As I preformed the maneuver I have perfected after years of defending my mattress territory, it occurred to me that my knowledge could certainly enrich another woman's lives as it has mine. Remember folks, as Toby Maguire said, "with great power comes great responsibility."
Phase 1: Leg Removal- Take one set of ice cold female toes. Press one to the back of a knee. Press the other to a tender inner thigh. Wait for that involuntary gasp then use the momentum of his own recoil to push said legs back to where they belong. You only get one shot at this so make sure those gams are good and glacial!
Phase 2: Trunk and Head Relocation- I have discovered that this particular part must be done smoothly and in tandem. Otherwise you risk waking the sleeping giant. First take both hands (If they are icy too it adds a certain "Je ne c'est quai?" but it isn't crucial) and place them on that hulking side. Shove and release. Shove and release, until you have a good rocking motion going. When he starts to stir give one final hard shove rolling him up onto his side while simultaneously sliding his pillows from the center of the bed back into his yard and under that giant chrome-us- dome-us. There. Now wait until he has settle back into deep sleep.
Phase 3: Initiate Quiet- If you are the sweet and forgiving sort you probably won't need this last step. For the rest of us who need just 5 snore free minutes to fall asleep, I have a never fail method. Take one female hand. Let it hover over that face that you love and adore and kiss. Then press it firmly over his mouth and nose and hold it there, slowly counting to 10. 1... 2... 3... you get the point. This next part is crucial, since no one wants to sleep next to a corpse. Remove your hand. Your husband will be so happy to breath he won't dare snore for at least 5 minutes.
Then drift off to dream land; pillows fluffed, silence gained, territory defended. Sweet Dreams.
Phase 1: Leg Removal- Take one set of ice cold female toes. Press one to the back of a knee. Press the other to a tender inner thigh. Wait for that involuntary gasp then use the momentum of his own recoil to push said legs back to where they belong. You only get one shot at this so make sure those gams are good and glacial!
Phase 2: Trunk and Head Relocation- I have discovered that this particular part must be done smoothly and in tandem. Otherwise you risk waking the sleeping giant. First take both hands (If they are icy too it adds a certain "Je ne c'est quai?" but it isn't crucial) and place them on that hulking side. Shove and release. Shove and release, until you have a good rocking motion going. When he starts to stir give one final hard shove rolling him up onto his side while simultaneously sliding his pillows from the center of the bed back into his yard and under that giant chrome-us- dome-us. There. Now wait until he has settle back into deep sleep.
Phase 3: Initiate Quiet- If you are the sweet and forgiving sort you probably won't need this last step. For the rest of us who need just 5 snore free minutes to fall asleep, I have a never fail method. Take one female hand. Let it hover over that face that you love and adore and kiss. Then press it firmly over his mouth and nose and hold it there, slowly counting to 10. 1... 2... 3... you get the point. This next part is crucial, since no one wants to sleep next to a corpse. Remove your hand. Your husband will be so happy to breath he won't dare snore for at least 5 minutes.
Then drift off to dream land; pillows fluffed, silence gained, territory defended. Sweet Dreams.
Friday, April 20, 2012
Shoetoptia
So I went out looking for a pair of cute shoes to wear to my friends wedding. I am wearing a coffee colored dress, so I wanted something colorful. I am photographing the wedding so it also needed to be pretty comfortable and allow me to move about. Also, I am poor and can't abide spending tons on footwear that I will not wear very often. So cheap, colorful, comfy shoes. I went to TJ Maxx, my favorite place on earth, and hit pay dirt almost immediately. They were sooo cute and colorful and at this price, I admit it, I bought two pairs. So excited. Nothing blisses me out like coming home with awesome new shoes.


Sunflower Uh Oh
In Maine we are usually just getting rid of all that darn snow about now, but its been so nice that during our second spell of 80 degree weather I went a little crazy and planted sunflowers. Behold, two weeks later, I have foot tall sunflower babies busting out of my little seed tray. Sigh, this seemed like a really good idea at the time!
 |
| This poor sunflower is screaming for more space! |

What am I going to do with 20 some odd sunflower plants? I can't plant them in the ground for a few more weeks! So to more accurately inquire, what am I going to do with 20 some odd sunflower plants, IN MY HOUSE!? My cat has already snacked on the leaves of one poor baby. Presently I have them on a cart and will be putting them outside as long as its nice. I guess thats all I can do until I can put them in the ground. oi- L
Friday, April 13, 2012
Strawberry Buttercream
As I stood at my kitchen island last night, furiously whirring mixer in one hand and a cloud of powdered sugar in my face, I was transported to a moment nearly two years ago. Imagine a younger and starry eyed Laura, mere hours from her wedding, standing at a counter, hand mixer whirring in one hand, gagging on a cloud of powdered sugar. She watches as the bowl of pink goop refuses to be anything close to the wedding cupcake frosting of her dreams. With a scant two hours until her wedding rehearsal the pink begins to look redder and redder until our blushing bride throws down the mixer, picks up her car keys, drives to the store and buys 8 cans of spray frosting.
I've survived two years of wedded bliss to Mr. Onion, but I still can't make this recipe anything but horrible! The first batch I frosted looked like this:


 |
| I won't tell you what this looks like to me. |

The very sight of the strawberry liquid separated from the cream and the looked like some kind of crystalized, curdle. Not pretty, but not terrible tasting although the consistency was all wrong and the flavor was too sugary and not enough strawberryness. In my head the perfect strawberry frosting is fresh and light and just the slightest bit sweet.
So I tried adding more powdered sugar, thinking if nothing else it would help with some of the unfortunate texture and consistency issues. This is what I got:


Better, but not by much. This frosting was still too soft (even after a night in the fridge) and too sugary for my taste. Seriously, my tongue hurts today from all the sugar.
So what did I do with them? Fed them to other people's children of course! You know what? The kids raved about them. They moaned, they licked the sloppy pinkness from arms and fingers, they made me promise not to change a thing (I crossed my fingers). I'm glad they enjoyed them and that they carried their sugar fueled little selves to someone else's home tonight.
The recipe I followed is from myrecipes.com
Ingredients
- 1 cup butter, softened
- 2 (16-ounce) packages powdered sugar, sifted
- 1 cup finely chopped fresh strawberries
- Preparation
- Beat butter at medium speed with an electric mixer 20 seconds or until fluffy. Add powdered sugar and chopped strawberries, beating at low speed until creamy. (Add more sugar if frosting is too thin, or add strawberries if too thick.)
Subscribe to:
Posts (Atom)